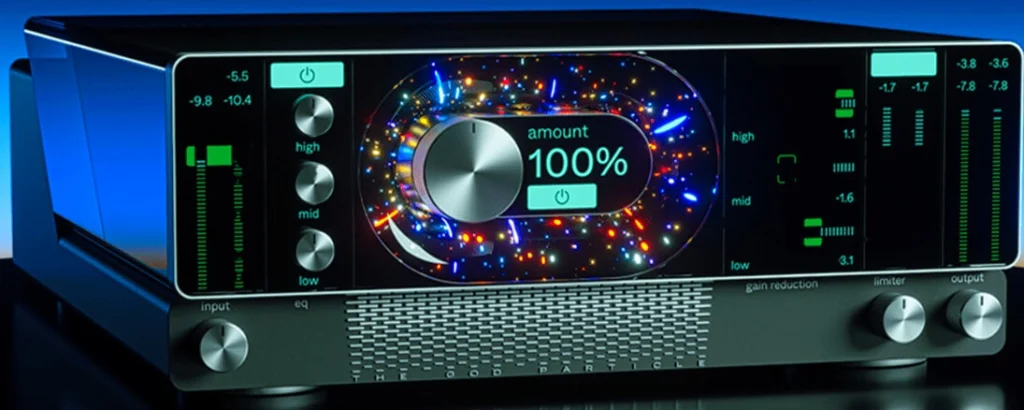
God Particle Plugin is a mixing and mastering plugin developed by JAYCEN JOSHUA( Grammy Award Winning Producer/Engineer).
Mr. Jayson claims that this plugin will save you time mastering a track. Jayson has put his mastering chain in this single plugin in the form of a tweakable preset.
This plugin combines EQ, Limiter, and saturation. It can be used to add clarity, depth, and uniqueness to the mix and to add analogue flavour to the sound. It also works as a multiband compressor to balance the mix’s frequencies.
In this article, I will discuss how this plugin works and the idea behind this plugin, and I will also give an honest review of it. So, let’s start.
Story and Analogy of Plugin
The idea behind this plugin is very simple and straightforward: to quickly achieve the desired sound. JAYCEN JOSHUA is also a teacher who teaches mixing and mastering to his students.
I have personally watched his mix with masters course/series. In that course, he showed his mastering chain, and at the end of that mastering chain, there was a preset. According to him, he uses that preset for most of his mixes.
Now, let me tell you what the preset consisted of. It consisted of a mini preset of ozone from Isotope and a few other plugins. This preset was designed to control the dynamics of the mid, high, and low ranges.
This preset was also designed to add some of the stereo imaging. As soon as the god particle came, I realized this plugin was going to be a tree of that preset.
But this was confirmed when I actually used the plugin. But he also added some of the extra features to this plugin beyond the preset.
Working Mechanism
It is a VST plugin that uses the DSP algorithm. Its working mechanism is very simple and similar to that of other plugins in the market. It is based on the three steps given below.
1. Signal Analysis
Like every digital plugin, it first recognizes the audio signal. Then, it uses a special algorithm called FFT (Fast Fourier Transform) to differentiate different components of the audio signal, such as frequencies, dynamic range, and the tonal structure of the input signal.
2. Modulations
The above step is also done by every mixing and mastering engineer, and in this case, the plugin does that. Now, moving to the second step is applying different effects to the sound.
In mastering, these effects are applied using dynamic modulations to adjust various parameters, such as amplitude, frequency response, and stereo imaging.
This same step is done by the plugin after the recognition of the nature of the audio signal. These effects can add real-time enhancement to the sound if they are done in the right way.
3. Learning from User Experience
Every mastering and mixing engineer has his own method. Now the question occurs: how can a plugin be useful in mastering and mixing for an engineer if every one of them is using their own methods?
This is a very critical question. For example, I use the full wet level of reverb, and then I pull the dry/wet knob to 50 or 40 per cent in order to get my desired reverb sound. On the other hand, I have seen many producers and mixing engineers who keep the wet level of reverb to a certain amount and do not bother with the dry/wet knob.
In the same way, people use different methods for mixing and mastering. To tackle this problem and shape itself according to everyone’s taste, God Particle Plugin has a hidden feature called Auto learn.
This feature is not accessible by the user, but it is always working at the backend. This feature helps the plugin track and learn from user behavior to mimic his method next time to his satisfaction.
It is just like a robot that is learning over time and training itself from the user method.
Now that I have fully explained the plugin’s working mechanism, it’s time to explain the plugin itself.
Explanation of the Plugin Controls
This is a mastering plugin, but it is a very simple plugin with just a few knobs. Although it is a mastering plugin but it has minimum controls, unlike other mastering plugins, which are very complex and can be challenging for beginners.
Explaining the plugin controls, let’s first talk about the interface.
Interface
The interface of the plugin is user-friendly. In the middle of the plugin, there is a big, giant knob. By turning this knob up, the wet level of the plugin increases.

To the left and right, there are LUFS, Ture Peak, and RMS meters that show the loudness in different aspects.
At the bottom of the plugin, there are input and output knobs which determine the input and output audio level. There is also a limiter in the form of a single knob at the bottom right end of this plugin.
