Hello and welcome back to the looptorrent. Today, we will discuss the plugin called crispytuner by Brainworx, which is produced in collaboration with a company called Plugin Alliance. This tuner plugin tunes different items like vocals, guitars, basses, drums, and much more. Most of you guys probably know that the market is teeming with these kinds of plugins. Now the question arises: What is the unique offer of this plugin that makes it stand out in the market compared to other plugins? In this blog, looptorrent is going to discuss all these factors and we will also discuss its working. We will also compare this plugin with the Auto-Tune Pro X, the most popular tuning plugin. So without wasting any time, let’s dive deep into the Crispytuner VST.
Working model the bx_crispyscale by Plugin Alliance
Crsipytuner is a plugin that is used to tune vocals. This is not a single plugin, but it comes with two plugins. One is Crispytuner itself, and the other plugin is the bx_crispyscale. Experienced producers can sense the key of any sound by just hearing it, But nowadays, many young producers have started music production. Their ears are not well-trained to sense the sound’s key by just hearing it. To solve this problem, Plugin Alliance has made a key detector plugin called the bx_crispyscale along with the crispy tuner.
So, when a producer wants to tune any instrument in his song, he has to put the key-detected plugin first in the track of the sound. These plugins take 7 to 8 seconds to detect the sound’s key. After that, there is also an option on the bx_crispyscale plugin that allows the user to send the detected key and scale it to the crispy-tuner plugin. After this, the user has to work on the tuner plugin to tune it.
Explanation of the Crispytuner by Plugin Alliance
The Crispytuner VST has three working modes. Each mode has special characteristics and is designed for beginners, intermediates, and professional producers. The three modes are given below.
- Simple Mode
- Advanced Mode
- Graphical Mode
1. Simple mode
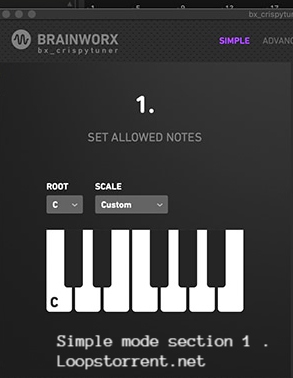
1. Scale and key selection
The simple mode is made for beginners new to music production or singing. When you open the plugin in your DAW, it is opened in simple mode. In this mode, the user is given three panels. In the first panel, the user can choose the scale and key according to which the plugin will take further actions. In this section, the user selects the traditional scales like major, minor, etc. but can also select its custom scales by selecting the specific notes on the keyboard given in this section.
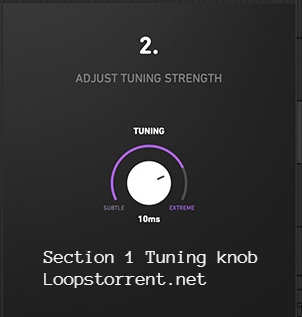
2. Tuning Knob
Now let’s talk about section 2 in which the user is given only one knob to adjust. This knob is called the tuning knob. This knob determines how strongly and quickly the plugin should correct the pitch of the sound. The Function of this knob is similar to the Retune speed knob of the Auto-Tune Pro plugin. Anyone who wants to attain the robotic voice, or we should say a Tpain-like voice, should set this knob to extreme value. In this case, the pitch correction effect will be significant and audible.
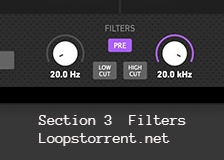
3. High cut and Low cut Filter
Now let us talk about the third section of the simple mode, which has some complex controls, But most producers don’t bother with these settings. In this section, the user can set the high-cut and low-cut filters. As this is a pitch correction plugin, providing controls like high and low cut does not make sense. You may consider this as an additional control.
4. Note tolerance
Next, the user can set note tolerance by setting the values of the time and pitch control. The pitch option is the real pitch control of the input signal. It is similar to the traditional pitch control already available in most digital audio workstations. Next to this, we have the time knob. This sets the delay time in the plugin. For example, if you have set 70ms in the time setting of the crispytuner, now when you play the audio, the audio will pass through the plugin, and the plugin will not process this audio for 70ms. After this time, the plugin will start its action.

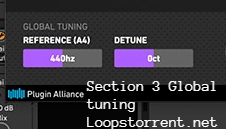
5. Global Tuning
In the global tuning section, we have the reference and detune controls. You may have seen the reference frequency in most plugins that deal with the pitch of the sound. By default, it is always 440 hertz, and you may have seen that most of the producers or vocalists don’t change this setting, nor do they explain why this is always 440 hertz. Let us explain this myth. Friends and fellows, this is the standard frequency that is globally recognized. Today, every song is recorded regarding this frequency of 440 Hertz. That is the main reason people don’t change this. If you change this frequency, the plugin will tune your vocals according to that frequency, and your vocals will not set into the song’s instrumental.
Next, we have the detune setting. This makes the plugin tune the input signal to the wrong note. It is mainly used to create harmonies.
2. Advanced Mode
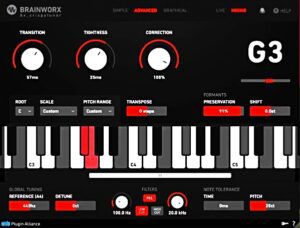
We have explained the simple mode of the plugin completely and with micro details. Now let’s talk about the advanced mode of the plugin. This mode is rather complex as compared to the simple mode. This model is designed for the intermediate users. Most of the time, professionals use this mode because it is a time saver and provides much more control over the signal input. This mode offers different parameters like transition, tightness, correction, preservation, shift transpose, etc. Loopstorrent will explain each of these controls. So without wasting any time, let’s look into these parameters.
1. Transition control
This is a very important control of the plugin. It is about how quickly or quickly the plugin should detect and correct the off-key note by bringing that note to the right key. A faster transition control will make the plugin correct the pitch very fast; in this way, the input signal may have a robotic effect. If the transition time is too slow, then the plugin will try to correct the pitch of the vocal, but the listener will still perceive it as out of tune. So use your ears to find the sweet spot that works well for your vocal or input signal. This effect will be audible when the vocalist shifts from one note to another.
2. Tightness Control
This is also a very essential control in the plugin. Most of you guys know that every human voice has a natural vibration. If you have the melodyne or newtone plugin of the FL Studio, you might have seen a zigzag line in every note. This line represents the natural vibration of the voice. If we make this straight, our voice will be perfectly tuned and sound like a robot. These types of settings are mostly used by an artist called Tpain. So we were talking about the tightness control. If we keep the tightness knob to its full extent, then it will straighten up our natural vibration of the recorded vocal and our vocal will be perfectly tuned. However, finding a sweet spot for natural tuning of the input signal is always recommended.
3. Correction control
This knob determines how accurately the plugin should pull the wrong sung note to the correct pitch.
After this, the basic controls like transpose and scale selection are explained above in the article. The transpose setting shifts a few semitones up or down the single note or whole vocals.
3. Graphical Mode
This mode is one of the best and most advanced, compared to the plugin’s simple and advanced mode. It offers more options and flexibility to manipulate the vocal recordings. Moreover, it also provides visuals for each note of the recording. This model is made for advanced users. The Crispytuner’s graphical mode provides endless possibilities. Now, let’s talk about using this mode for your records.
So we have explained the bx crispytuner entirely. We hope that you guys will love this article. If you have any questions, please ask them in the comment box.
- Plugin Alliance – Brainworx bx crispytuner v1.1.0 VST, VST3, AAX x64 [05/19/2024]
- Original Publisher: Plugin Alliance
- Version: 1.1.0
- Format: VST, VST3, AAX
- Category: VST Plugins
- Require: Windows 8 or higher
- License type: Full
- Size: 20.4 MB